Hexo+Github 搭建之路-基础篇

如果你对默认配置满意,只需几个命令便可秒搭一个hexo。 如果你跟我一样喜欢折腾下,30分钟也足够个性化。 如果你过于喜欢折腾,可以折腾个把星期,尽情的玩。
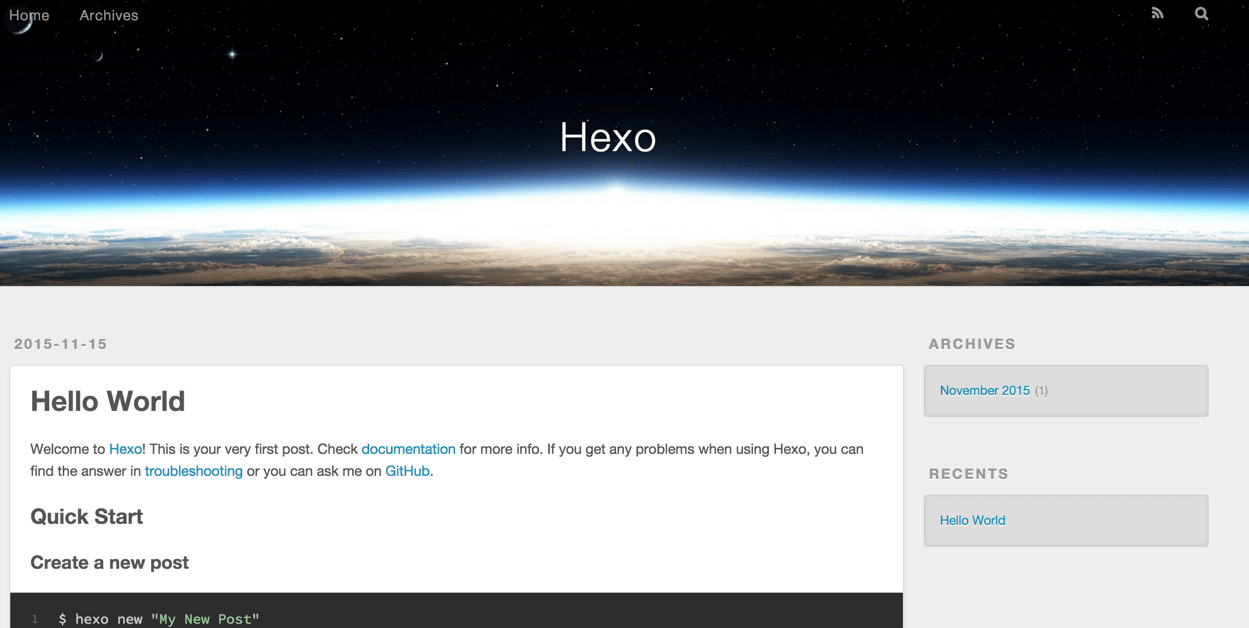
就是看到这段话,让我决定落脚在Hexo和Githu上,Hexo是一个快速、简洁且高效的博客框架,而Github是一个免费的代码托管工具,利用Github Page可以免费创建一个静态网站。
其实最后只需要几个简单命令,你就可以完成一切。但是在那之前,却不是我想的那么简单,下面逐步介绍,进入正题。
环境准备
安装Node 到Node.js官网下载相应平台的最新版本,一路安装即可。 安装Git 到Git官网,安装过程网上一堆,很简单。
创建Github账号
如果已经注册Github,可跳过此步骤。否则,访问Github官网进行注册,下面假设你注册Github账号名为MyGithub。
创建与账号同名的Repository
注册并登陆Github官网成功后,点击页面右上角的
+,选择New repository。
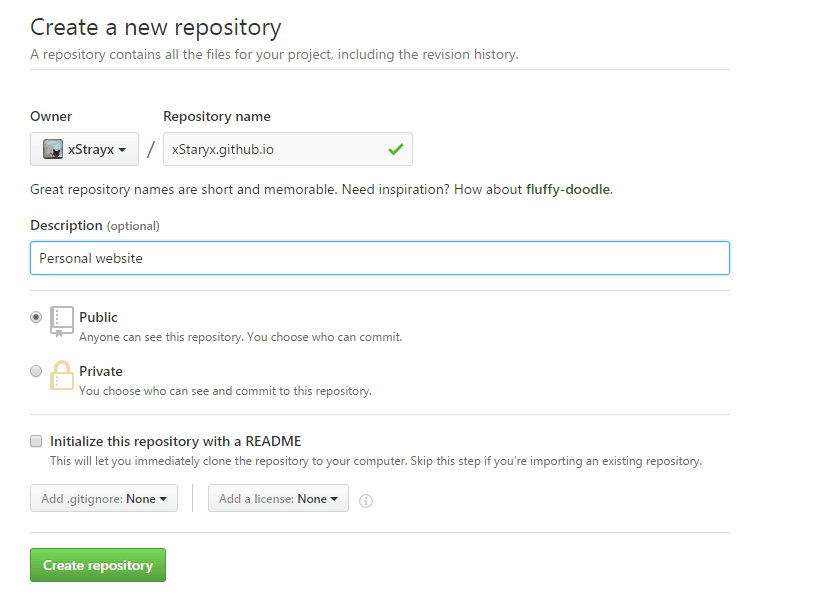
在Repository name中填写你的Github账号名.github.io,这里是MyGithub.github.io。Description中填写对此repository的描述信息(可选,但建议填写,如Personal website)。 
点击Create repository,完成创建。
添加SSH-Key
首先设置你的用户名密码:
$ git config --global user.name "Your Name"
$ git config --global user.email "[email protected]"
生成密钥:
ssh-keygen -t rsa -C "[email protected]"
想简单,过程一路回车。
ssh-keygen -t rsa -C "[email protected]"    你的email帐户
Generating public/private rsa key pair.
Enter file in which to save the key (/c/documents and Settings/Administrator/.ssh/id_rsa): (设置保存公钥和私钥的位置,保持默认,可以不填直接回车)
Enter passphrase (empty for no passphrase): (读取id_rsa的密码,可不填,不过建议填写)
Enter same passphrase again: (再次输入id_rsa密码确认)
Your identification has been saved in /c/documents and Settings/Administrator/.ssh/id_rsa.
Your public key has been saved in /c/documents and Settings/Administrator/.ssh/id_rsa.pub.
The key fingerprint is:生成的KEY 你的email帐户
上述命令若执行成功,会在c/documents and Settings/Administrator/.ssh/目录下生成两个文件id_rsa和id_rsa.pub,最后两步:
用文本编辑器打开id_rsa.pub文件,拷贝其中的内容,将其添加到Add SSH Key 不会添加的百度一下,这里不再说了。
最后可以验证一下:
ssh -T [email protected]
顺利的话可以看到下面的信息
Hi Your Name! You've successfully authenticated, but GitHub does not provide shell access.
安装
Node和Git都安装好后,可执行如下命令安装hexo:
npm install -g hexo
初始化
然后,执行init命令初始化hexo到你指定的目录:
hexo init <folder>
也可以cd到目标目录,执行
hexo init。
好啦,至此,全部安装工作已经完成!
生成静态页面
cd 到你的init目录,执行如下命令,生成静态页面至hexo\public\目录。
hexo generate
命令必须在
init目录下执行,否则不成功,但是也不报错。 当你修改文章Tag或内容,不能正确重新生成内容,可以删除hexo\db.json后重试,还不行就到public目录删除对应的文件,重新生成。
本地启动
执行如下命令,启动本地服务,进行文章预览调试。
hexo server
浏览器输入http://localhost:4000就可以看到效果。 
请使用高级浏览器,否则可能看不到你想要的...
主题安装
Hexo的主题有很多,而且都很不错,可以到Hexo themes找你喜欢的。 本文以Next主题为例,安装主题的方法就是一句git命令:
在终端窗口下,定位到 Hexo 站点目录下。使用 Git checkout 代码:
$ cd your-hexo-site
$ git clone https://github.com/iissnan/hexo-theme-next themes/next
安装完成后,打开hexo_config.yml,修改主题为NexT
theme: NexT
打开hexo\themes\modernist目录,编辑主题配置文件_config.yml:
menu: #配置页头显示哪些菜单
#  Home: /
  Archives: /archives
  Reading: /reading
  About: /about
#  Guestbook: /about

excerpt_link: Read More #摘要链接文字
archive_yearly: false #按年存档

widgets: #配置页脚显示哪些小挂件
  - category
#  - tag
  - tagcloud
  - recent_posts
#  - blogroll

blogrolls: #友情链接
  - bruce sha's duapp wordpress: http://ibruce.duapp.com
  - bruce sha's javaeye: http://buru.iteye.com
  - bruce sha's oschina blog: http://my.oschina.net/buru
  - bruce sha's baidu space: http://hi.baidu.com/iburu

fancybox: true #是否开启fancybox效果

duoshuo_shortname: buru #多说账号

google_analytics:
rss:
更新主题
cd themes/modernist
git pull
主题其它使用配置及常见问题点此:NexT 使用文档
写文章
执行new命令,生成指定名称的文章至hexo\source\_posts\postName.md。
hexo new [layout] "postName" #新建文章
其中layout是可选参数,默认值为post。有哪些layout呢,请到scaffolds目录下查看,这些文件名称就是layout名称。当然你可以添加自己的layout,方法就是添加一个文件即可,同时你也可以编辑现有的layout,比如post的layout默认是hexo\scaffolds\post.md
title: { { title } }
date: { { date } }
tags:
---
请注意,大括号与大括号之间我多加了个空格,否则会被转义,不能正常显示。
我想添加categories,以免每次手工输入,只需要修改这个文件添加一行,如下:
title: { { title } }
date: { { date } }
categories:
tags:
---
postName是md文件的名字,同时也出现在你文章的URL中,postName如果包含空格,必须用”将其包围,postName可以为中文。
注意,所有文件:后面都必须有个空格,不然会报错。
看一下刚才生成的文件hexo\source\_posts\postName.md,内容如下:
title: postName #文章页面上的显示名称,可以任意修改,不会出现在URL中
date: 2013-12-02 15:30:16 #文章生成时间,一般不改,当然也可以任意修改
categories: #文章分类目录,可以为空,注意:后面有个空格
tags: #文章标签,可空,多标签请用格式[tag1,tag2,tag3],注意:后面有个空格
---
这里开始使用markdown格式输入你的正文。
接下来,你就可以用喜爱的编辑器尽情书写你的文章。Markdown 语法说明。
文章摘要
在需要显示摘要的地方添加如下代码即可:
以上是摘要
<!--more-->
以下是余下全文
more以上内容即是文章摘要,在主页显示,more以下内容点击『> Read More』链接打开全文才显示。
hexo中所有文件的编码格式均是UTF-8。
Hexo命令
常用命令:
hexo new "postName" #新建文章
hexo new page "pageName" #新建页面
hexo generate #生成静态页面至public目录
hexo server #开启预览访问端口(默认端口4000,'ctrl + c'关闭server)
hexo deploy #将.deploy目录部署到GitHub
常用复合命令:
hexo deploy -g
hexo server -g
简写:
hexo n == hexo new
hexo g == hexo generate
hexo s == hexo server
hexo d == hexo deploy
至此,基本操作介绍完毕,以下内容普通用户无需了解。
目录介绍
默认目录结构:
.
├── .deploy
├── public
├── scaffolds
├── scripts
├── source
|   ├── _drafts
|   └── _posts
├── themes
├── _config.yml
└── package.json
- .deploy:执行hexo deploy命令部署到GitHub上的内容目录
- public:执行hexo generate命令,输出的静态网页内容目录
- scaffolds:layout模板文件目录,其中的md文件可以添加编辑
- scripts:扩展脚本目录,这里可以自定义一些javascript脚本
- source:文章源码目录,该目录下的markdown和html文件均会被hexo处理。该页面对应repo的根目录,404文件、favicon.ico文件,CNAME文件等都应该放这里,该目录下可新建页面目录。
- _drafts:草稿文章
- _posts:发布文章
- themes:主题文件目录
- _config.yml:全局配置文件,大多数的设置都在这里
- package.json:应用程序数据,指明hexo的版本等信息,类似于一般软件中的关于按钮
接下来是重头戏_config.yml,做个简单说明:
# Hexo Configuration
## Docs: http://zespia.tw/hexo/docs/configure.html
## Source: https://github.com/tommy351/hexo/

# Site #整站的基本信息
title:  #网站标题
subtitle: 码农,程序猿 #网站副标题
description: bruce sha's blog | java | scala | bi #网站描述,给搜索引擎用的,在生成html中的head->meta中可看到
author: bruce #网站作者,在下方显示
email: *****[email protected] #联系邮箱
language: zh-CN #语言

# URL #域名和文件结构
## If your site is put in a subdirectory, set url as 'http://yoursite.com/child' and root as '/child/'
url: http://xheartx.como #你的域名
root: /
permalink: :year/:month/:day/:title/
tag_dir: tags
archive_dir: archives
category_dir: categories
code_dir: downloads/code

# Writing #写文章选项
new_post_name: :title.md # File name of new posts
default_layout: post #默认layout方式
auto_spacing: false # Add spaces between asian characters and western characters
titlecase: false # Transform title into titlecase
external_link: true # Open external links in new tab
max_open_file: 100
multi_thread: true
filename_case: 0
render_drafts: false
highlight: #代码高亮
  enable: true #是否启用
  line_number: false #是否显示行号
  tab_replace:

# Category & Tag #分类与标签
default_category: uncategorized # default
category_map:
tag_map:

# Archives #存档,这里的说明好像不对。全部选择1,这个选项与主题中的选项有时候会有冲突
## 2: Enable pagination
## 1: Disable pagination
## 0: Fully Disable
archive: 1
category: 1
tag: 1

# Server #本地服务参数
## Hexo uses Connect as a server
## You can customize the logger format as defined in
## http://www.senchalabs.org/connect/logger.html
port: 4000
logger: true
logger_format:

# Date / Time format #日期显示格式
## Hexo uses Moment.js to parse and display date
## You can customize the date format as defined in
## http://momentjs.com/docs/#/displaying/format/
date_format: MMM D YYYY
time_format: H:mm:ss

# Pagination #分页设置
## Set per_page to 0 to disable pagination
per_page: 10 #每页10篇文章
pagination_dir: page

# Disqus #社会化评论disqus,我使用多说,在主题中配置
disqus_shortname:

# Extensions #插件,暂时未安装插件
## Plugins: https://github.com/tommy351/hexo/wiki/Plugins
## Themes: https://github.com/tommy351/hexo/wiki/Themes
## 主题
theme: modernist # raytaylorism # pacman # modernist # light
exclude_generator:

# Deployment #部署
## Docs: http://zespia.tw/hexo/docs/deploy.html
deploy:
  type: github
  repository: [email protected]:bruce-sha/bruce-sha.github.com.git #你的GitHub Pages仓库
修改局部页面
页面展现的全部逻辑都在每个主题中控制,源代码在hexo\themes\你使用的主题\中,以Next主题为例:
.
├── languages          #多语言
|   ├── default.yml    #默认语言
|   └── zh-CN.yml      #中文语言
├── layout             #布局,根目录下的*.ejs文件是对主页,分页,存档等的控制
|   ├── _partial       #局部的布局,此目录下的*.ejs是对头尾等局部的控制
|   └── _widget        #小挂件的布局,页面下方小挂件的控制
├── source             #源码
|   ├── css            #css源码
|   |   ├── _base      #*.styl基础css
|   |   ├── _partial   #*.styl局部css
|   |   ├── fonts      #字体
|   |   ├── images     #图片
|   |   └── style.styl #*.styl引入需要的css源码
|   ├── fancybox       #fancybox效果源码
|   └── js             #javascript源代码
├── _config.yml        #主题配置文件
└── README.md          #用GitHub的都知道
更新
更新hexo:
npm update -g hexo
更新主题:
cd themes/你的主题
git pull
更新插件:
npm update
插件推荐
hexo官方文档hexo插件大全自定义网站logoMarkDown中文网MarkDown语法说明社交分享推荐使用jiathis评论插件推荐使用duoshuo网站流量统计推荐cnzz网站流量统计推荐百度统计
通过以上的设置,相信你已经可以通过注册域名来访问一个默认的hexo主题页面了。之后的工作就在于, (1)如何对主题进行个性化设置及; (2)发表博文以充实网站内容。 这里有关于next主题的个性化设置说明。